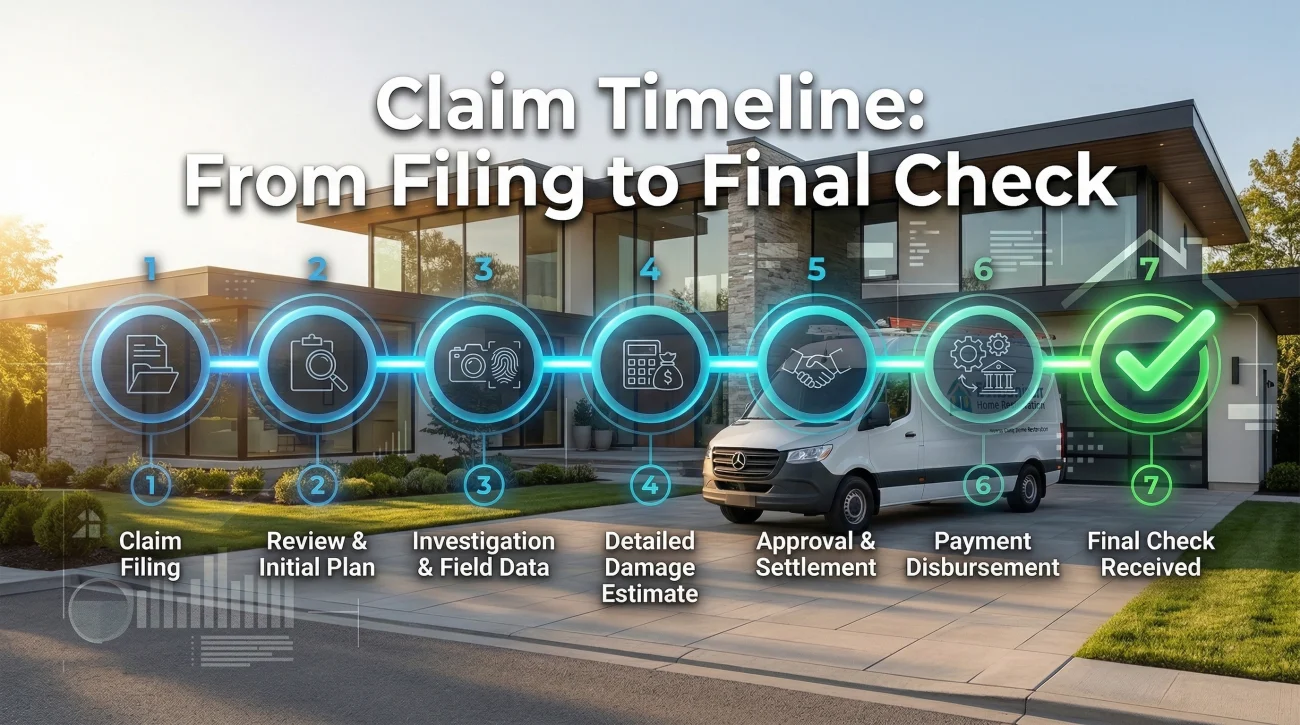
- The claim process is not a single event. It is a multi-stage timeline involving documentation, inspection, estimating, and a two-part payment system.
- Most homeowners leave money on the table because they do not understand the recoverable depreciation system (the second check).
- The settlement offer you receive is directly tied to the completeness of the adjuster’s initial scope document, which is why the inspection phase is critical.
The Reality of Filing a Property Claim
Most homeowners have never filed a major property claim before. When a pipe bursts, a kitchen catches fire, or a storm tears off shingles, the immediate reaction is to call the insurance company and assume a straightforward process will follow. You report the damage, they look at it, and they pay to fix it. In my years of reviewing property claims from the other side of the desk, I have learned that the actual standard home insurance claim process rarely works quite that simply.
The system is built on specific procedures, strict documentation requirements, and estimating software that speaks a language most people outside the industry do not understand. As a result, the process often feels opaque and frustrating.
I wrote this guide to walk you through exactly what happens from the moment you decide to file until the final check is cashed. I will explain the mechanics of each stage, what the people assigned to your file are actually doing, and where I consistently see claims break down. Knowing the map before you start walking is the best way to protect your home and your financial recovery.
Stage 1: Reporting the Claim and the First 48 Hours

The process officially begins the moment you contact your insurer to report a loss. This initial phone call or online submission triggers the creation of your claim file and the assignment of a claim number. However, what you do in the hours immediately following the damage is often more important than the phone call itself.
When you report the claim, the representative will ask for basic facts: the date of the loss, the type of damage, the rooms affected, and whether the home is currently livable. Stick to the facts. Avoid speculating about the cause if you are not entirely sure, as early speculation recorded in the system can complicate coverage decisions later.
💡 Pro Tip: Your policy requires you to mitigate further damage. This means stopping the active leak, boarding up a broken window, or throwing a tarp over an exposed roof. Do not wait for the adjuster to arrive before taking these emergency steps, but never throw away damaged materials before they have been inspected.
Establishing the Communication Log
One of the most common mistakes I see is homeowners relying on phone calls to manage their claim. Phone calls leave no paper trail. From day one, you need a written record. If your claim drags on for months or your file is suddenly reassigned to a new adjuster, which happens frequently, your written log is the only undeniable proof of what was reported, when it was reported, and what you were promised. Every time you speak with a representative, follow up with a brief email confirming the exact details of what was discussed. For a complete list of what else you need to document early on, see our home insurance claim checklist.
Stage 2: Adjuster Assignment
Within a few days of filing, your claim will be assigned to an adjuster. It is crucial to understand who this person is and what their role entails. You will typically interact with two types of company adjusters: the desk adjuster and the field adjuster.
The desk adjuster works inside the insurance company’s office. They manage the paperwork, review the policy limits, and ultimately issue the checks. The field adjuster is the person who physically comes to your house. In many cases, especially after large weather events, the field adjuster is an “independent adjuster.” Despite the name, they do not work independently for you. They are third-party contractors hired by the insurance company to assess damage on their behalf.
“A common misunderstanding I see is homeowners thinking the field adjuster is their personal project manager. The field adjuster’s job is strictly to document visible damage, apply it to the carrier’s pricing software, and submit a report. They do not work for you, and they cannot approve structural changes or contractor upgrades.”
If you are confused about who is representing whom, spending time understanding the difference between public and company adjusters is a critical step before the inspection happens.
Stage 3: The Inspection Visit
The field adjuster’s visit is the most critical physical event in the claim timeline. The documentation gathered during this visit forms the foundation of your settlement offer. If damage is not photographed, measured, and noted during this visit, it will likely not exist on the initial estimate.
A thorough inspection of significant damage takes time. The adjuster should be taking extensive photographs, sketching room dimensions, measuring moisture levels in drywall or subflooring, and inspecting adjacent rooms for secondary damage. If your kitchen is ruined and the adjuster is in and out of your house in 15 minutes snapping a few iPad photos, your scope of loss will almost certainly be incomplete.
Why Your Pre-Inspection Documentation Matters
The adjuster can only document what is visible and accessible on the exact day they arrive. If a mitigation company has already torn out wet drywall, or if a roof tarp has been nailed down, the adjuster cannot see the original state of the damage. This is why having your own pre-cleanup evidence is essential.
Assuming the adjuster knows how bad the damage was on the day it happened.
The adjuster’s scope reflects only the physical evidence they can see on the day of inspection. If cleanup hid the damage and you have no pre-cleanup photos, it will likely be excluded.
During this visit, you may be asked questions about the maintenance history of your home. It is very important to answer factually without minimizing the damage or offering unnecessary speculation. For a detailed breakdown of communication traps, review our guide on what not to say to a home insurance adjuster.
Stage 4: Building the Scope of Loss
After the adjuster leaves your property, they return to their desk (or vehicle) to write the “scope of loss.” This is not a rough guess of what repairs will cost. It is a highly detailed, line-by-line itemization of every material and labor hour required to put your home back to its pre-loss condition.
To do this, more than 80% of the insurance industry uses a software program called Xactimate. Xactimate calculates costs based on the dimensions of your rooms and regional pricing databases. Every single action requires a specific code in the software.
Key Point: If an item is missing from the scope of loss, it is missing from your settlement check. The software only calculates what the adjuster manually enters into it.
For example, if drywall needs to be replaced, the software needs a line item for the drywall material, a line item for the screws, a line item for the mud and tape, a line item for the texture, a line item for the primer, and a line item for the paint. If the adjuster only enters “drywall and paint,” the estimate will be artificially low because the preparatory steps were omitted.
This is precisely why initial estimates are often lower than real-world contractor bids. The adjuster writes the scope based on surface-level visibility, while your contractor writes their bid based on the reality of tearing into the structure and doing the actual work.
Stage 5: The Settlement Offer and the Two-Check System
Once the desk adjuster reviews and approves the field adjuster’s scope of loss, you will receive a settlement package. This is the stage where most homeowners experience severe confusion, primarily because of a concept called depreciation.
What is Actually in Your Settlement Package
When the settlement arrives, it is rarely just a check. Most homeowners are overwhelmed by the paperwork, but you only need to focus on three core components:
- The Estimate Document: The multi-page, line-by-line Xactimate breakdown of what they are paying for.
- The Coverage Letter: The formal explanation of how your policy applies, including any specific reasons why certain damage was excluded.
- The ACV Check: The initial payout, reflecting the cost of repairs minus depreciation.
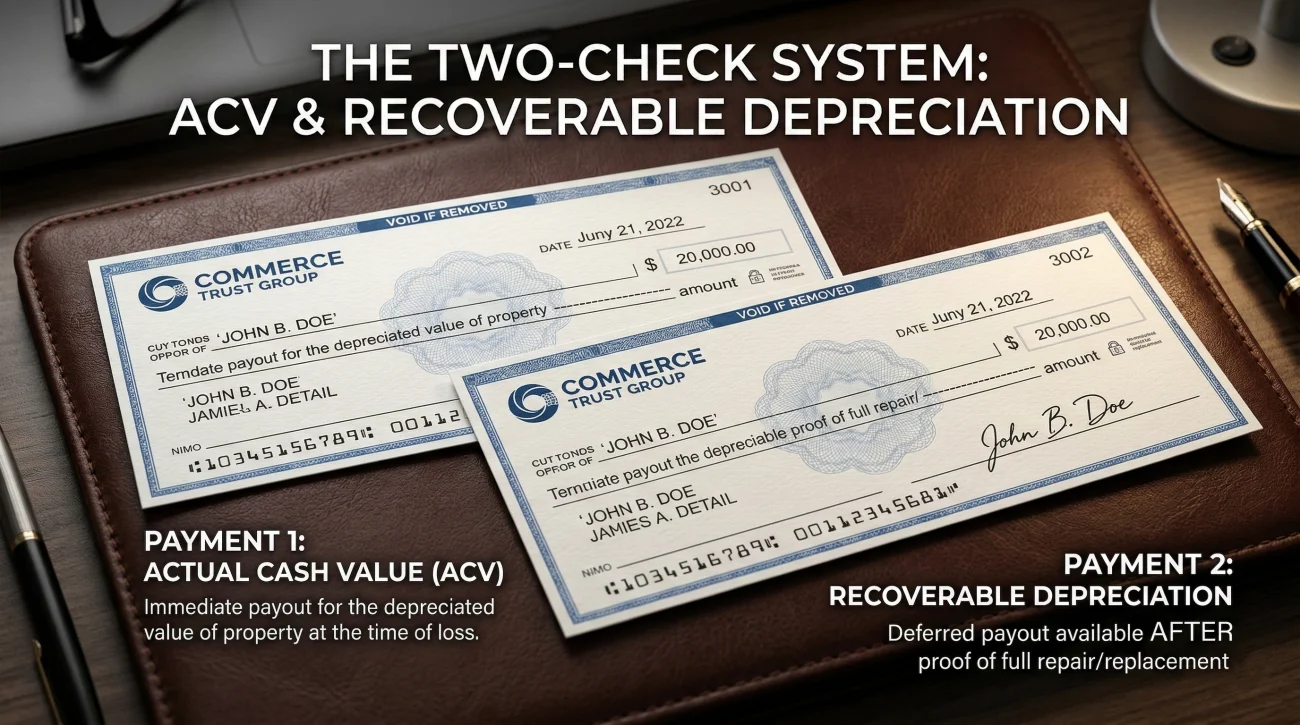
If you have a standard Replacement Cost Value (RCV) policy, your payout is delivered in a two-check system. Understanding this mechanic is vital.
- ✅ Actual Cash Value (ACV): This is the amount of the first check. It represents the cost to replace your damaged property, minus a deduction for age and wear-and-tear (depreciation).
- ✅ Recoverable Depreciation: This is the money held back by the insurance company. You do not lose this money, but you must prove you actually completed the repairs to get it.
- ✅ Replacement Cost Value (RCV): This is the total amount (ACV + Recoverable Depreciation) required to fix the damage at today’s prices.
Many homeowners receive the ACV check, look at the number, realize it is not enough to cover the contractor’s bid, and panic. They assume the claim is closed and the insurer is refusing to pay the rest. In reality, the insurer is waiting for you to incur the cost of the repairs before releasing the second check. For a deeper explanation of this specific claiming mechanic, read our complete guide on how the two-check system works.
Stage 6: Accepting, Disputing, and Supplementing
Receiving a settlement check does not mean you are forced to accept the adjuster’s exact scope of work. Cashing the ACV check rarely closes the claim legally (though you should always read the fine print on any coverage letter). It simply gives you seed money to start mitigation and repairs.
When you show the insurance estimate to your chosen contractor, there is almost always a gap. The contractor will likely find hidden damage the adjuster could not see, or they will note that local labor rates are higher than what Xactimate predicted. When this happens, a “supplement” must be filed.
A supplement is a formal request to the insurance company asking them to add missing line items or revise pricing on the original scope of loss. Your contractor can submit this, or you can submit it. The insurer will review the supplement, often requiring photos of the newly discovered damage, and either approve it or request a re-inspection.
“The supplement process is where the actual claim resolution happens. Insurers expect contractors to find hidden damage once walls are opened. A supplement is not an argument; it is the standard industry mechanism for correcting an initial, surface-level scope.”
However, insurers sometimes use the supplement process to grind down the payout, denying necessary line items or claiming damage is unrelated. If you notice a pattern of unexplained denials, you may be encountering standard insurance adjuster tactics designed to limit the carrier’s exposure.
What happens if they do not just underpay the scope, but deny the damage entirely? A full denial is a different outcome than a low estimate. If your settlement package cites an exclusion and refuses payment, see our guide on what to do when your home insurance claim is denied.
Stage 7: Repairs and Final Payment
Once the scope is agreed upon and supplements are approved, the repair work begins. As your contractor completes the job, they will issue final invoices. You must submit these invoices, along with proof of payment (or a certificate of completion), to your desk adjuster.
Upon receiving the final invoices, the insurer releases the recoverable depreciation (the second check). If your mortgage company is listed on your policy, the claim checks will likely be made out to both you and your lender. The lender will hold the funds in escrow and release them in draws as the contractor completes the work.
Why the Final Payment is Often Delayed
Even after repairs are finished, getting the final depreciation check is rarely instantaneous. The most common bottlenecks include:
- Mortgage Escrow Processes: If your lender is on the check, their internal loss draft department must endorse the payment, which often requires a third-party inspection to verify repairs are complete.
- Contractor Invoice Formats: Desk adjusters require itemized final invoices. If your contractor submits a single line-item bill stating “Repairs Complete,” the insurer will likely reject it and delay payment.
- Pending Supplements: If a final supplement was submitted during the last phase of construction but has not been officially approved, the desk adjuster cannot release the final depreciation funds.
Warning: Policies have strict deadlines for claiming recoverable depreciation. In many standard policies, you have 180 days to one year from the date of the loss (or the date of the ACV payment) to complete repairs and request the withheld funds. If you miss this window, the insurance company keeps the depreciation money permanently.
Claim Process Timeline Summary
While the table below outlines a standard scenario, you can review our full guide on how long a home insurance claim should take to understand the difference between normal delays and intentional stalling.
| Claim Stage | When / Duration |
|---|---|
| 1. Reporting the Claim | Report within 24 to 48 hours of the damage occurring |
| 2. Adjuster Assignment | 1 to 3 days after reporting |
| 3. The Inspection Visit | 3 to 14 days, depending on weather events |
| 4. Scope of Loss Written | 1 to 2 weeks after inspection |
| 5. Initial Settlement (ACV Check) | Days to a few weeks after the scope is finalized |
| 6. Supplements & Negotiation | Ongoing throughout the repair process |
| 7. Final Payment (RCV Check) | 1 to 3 weeks after submitting final invoices |
Signs Your Claim Process May Have Gone Wrong
While the steps above outline how the process is supposed to work, reality on the ground is often different. If you are currently navigating a claim, these are the operational red flags indicating that your final settlement is at risk of being severely underpaid:
- Your damage involves multiple rooms, structural elements, or heavy water saturation, but the field adjuster’s inspection lasted less than 60 minutes.
- You received a settlement offer within a few days of the inspection, which often means the scope was rushed and hidden damage was ignored.
- Your independent contractor’s estimate is significantly higher than the insurance company’s offer, and the difference is rooted in missing line items, not just pricing.
- Your home suffered multiple types of damage (e.g., wind damage to the roof and resulting water damage inside), but the estimate only addresses one peril.
- The adjuster visually looked at water stains but did not utilize moisture meters or thermal imaging cameras to check for trapped water behind the drywall.
If you recognize any of these patterns in your current situation, the core question is whether your scope of loss is actually complete. You do not have to fight this battle alone. Bringing in a professional to audit the paperwork can level the playing field. If you suspect your claim is off track, you should consider requesting a free claim review from a licensed public adjuster to see what the insurance company missed.
Further Reading: The Claim Process Library
The standard process has many specific offshoots and decision points. We have broken down every major sub-topic in the list below. Select the scenario that best matches your current situation.
| Topic | Summary of Guide |
|---|---|
| How Long Does a Home Insurance Claim Take? | Stage-by-stage typical timelines, and how to tell the difference between a normal backlog and intentional delay tactics. |
| Home Insurance Claim Adjuster Secret Tactics | A breakdown of how adjusters use fast settlements, scope minimization, and recorded statements to limit claim payouts. |
| What Not to Say to a Home Insurance Adjuster | Communication pitfalls during property claims, including the dangers of “deferred maintenance” traps and speculation. |
| Home Insurance Claim Checklist | Actionable preparation guide detailing exactly what documentation you need to gather to protect your settlement outcome. |
| ACV vs RCV Home Insurance (Two-Check System) | A deep dive into how depreciation holdback works, and the exact mechanics of claiming your final replacement cost check. |
| Home Insurance Claim Under Investigation | What it means when your claim stalls for investigation, the difference between routine checks and SIU, and warning signs. |
| Home Insurance Claim Estimate Too Low | Why the adjuster’s estimate rarely matches your contractor’s bid, focusing on the critical difference between scope gaps and pricing gaps. |
| Home Insurance Claim Check Payment | Practical answers regarding mortgage lienholders, cash settlement risks, doing your own repairs, and tax implications. |
| Can You Reopen, Cancel, or Withdraw a Claim? | The rules and mechanics for managing a claim already in progress, including how to reopen a closed file for missed scope. |
Final Thoughts on Managing the Process
Treating your home insurance claim like a casual administrative task is the fastest way to end up paying out of pocket for repairs. The system requires you to be an active participant. You must maintain meticulous records, confirm every conversation in writing, and critically review the documents provided by the adjuster.
Remember that the first offer is rarely the final offer. The process is designed to be negotiated, supplemented, and adjusted based on real-world evidence. Keep your emotions out of the correspondence, focus on line-item facts, and do not hesitate to escalate to a professional if the process stalls or the scope of loss ignores reality.
❓ FAQ
🏚️ What happens immediately after I file a home insurance claim?
After filing, a claim number is generated and a desk adjuster is assigned to your file. Within 24 to 48 hours, they will typically contact you to review your policy coverage and schedule a time for a field adjuster to inspect the damage.
⏱️ How long does the insurance adjuster have to come to my house?
While specific timelines vary by state regulations and the severity of regional weather events, a field adjuster usually contacts you within a few days to schedule an appointment. The inspection itself typically occurs within one to two weeks of filing the claim.
📸 Do I need to clean up the damage before the adjuster arrives?
You must mitigate the damage to prevent it from getting worse (like stopping a leak), but do not throw away damaged items or perform permanent repairs. Take extensive photos and videos of everything before moving or extracting any water or debris.
📝 What is the difference between the first check and the second check?
The first check is the Actual Cash Value (ACV), which is the cost of repairs minus depreciation. The second check is the recoverable depreciation, which the insurance company holds back until you provide contractor invoices proving the repair work was actually completed.
🤔 Why did my insurance company send me a check so quickly?
Fast checks are usually based on a preliminary, surface-level scope of loss. Insurers issue these quickly to close the file fast. It does not mean the claim is finalized; you can and should file a supplement if your contractor finds hidden damage.
🛑 Can I start repairs before the insurance company approves them?
You should only perform temporary emergency repairs to prevent further damage. Do not begin full structural repairs until the adjuster has inspected the property and provided an initial estimate, otherwise, they may deny coverage for lack of evidence.
💬 What should I do if the adjuster’s estimate is lower than my contractor’s?
Compare the two documents line by line. The gap is usually because the adjuster missed items (a scope gap), not just a difference in material prices. Provide the contractor’s itemized estimate to the desk adjuster and request a supplement to cover the missing items.
🏠 Do I have to use the contractor the insurance company recommends?
No. In most cases, you are not required to use the insurer’s preferred vendors. While these programs exist, you are not obligated to use them, and it is often safer to hire an independent contractor who works strictly for you.
📅 How long do I have to cash my home insurance claim check?
The physical check usually expires within 90 to 180 days, as printed on the front. However, cashing it does not prevent you from requesting more money later. The more critical deadline is the window to complete repairs and claim your final depreciation check.
🔄 Can I reopen my claim if I find more damage later?
Yes, in many cases, a claim can be reopened or supplemented if new damage directly related to the original event is discovered during the repair process. You must document the new damage thoroughly and submit it to the adjuster for review.
Each part of a claim has its own logic. These cover the rest of the journey.
- How a claim moves from filing to final payment
- What your policy actually covers and what it does not
- Which damage types get paid and which get excluded
- When filing a claim makes sense and when it works against you
- What to do after a denial and what your actual options are
- What a public adjuster does and when you actually need one
- When legal help is the move that changes the outcome
Most homeowners do not know when they are being underpaid. These help identify the pattern.
- 5 patterns that signal your settlement is probably short
- Who the adjuster at your door actually works for
- Where water damage estimates most often fall short
- What fire damage settlements commonly leave out
- Why your roofer's number and the insurer's estimate do not match
- When a denial needs legal leverage, not just negotiation
- Four paths to fight a denial, including one most homeowners miss
Disclosure: I'm sharing my personal industry experience, but I am not an attorney or a licensed insurance agent. The guides on this site are for informational purposes to help you understand the operational side of property claims: process, organization, and documentation. Every policy is unique, so please defer to your specific policy language. For legal interpretation, contested situations, or binding advice, always consult a licensed professional in your jurisdiction.